Beautiful nails don’t always require expensive salon appointments. With the right tools, a little patience, and some creativity, anyone can create stunning nail designs at home. Whether you’re a complete beginner or looking to improve your skills, this tutorial will help you achieve professional-looking results from the comfort of your own space.
Why Learn Nail Art at Home?
Learning nail art is a fun and rewarding hobby that allows you to express your personality through creative designs. It can also save money, provide relaxation, and give you the freedom to experiment with endless colors, patterns, and trends whenever inspiration strikes.
Step 1: Prepare Your Nails
A beautiful manicure starts with healthy, clean nails.
What You’ll Need:
- Nail file
- Cuticle pusher
- Nail buffer
- Nail polish remover
- Cotton pads
- Hand cream
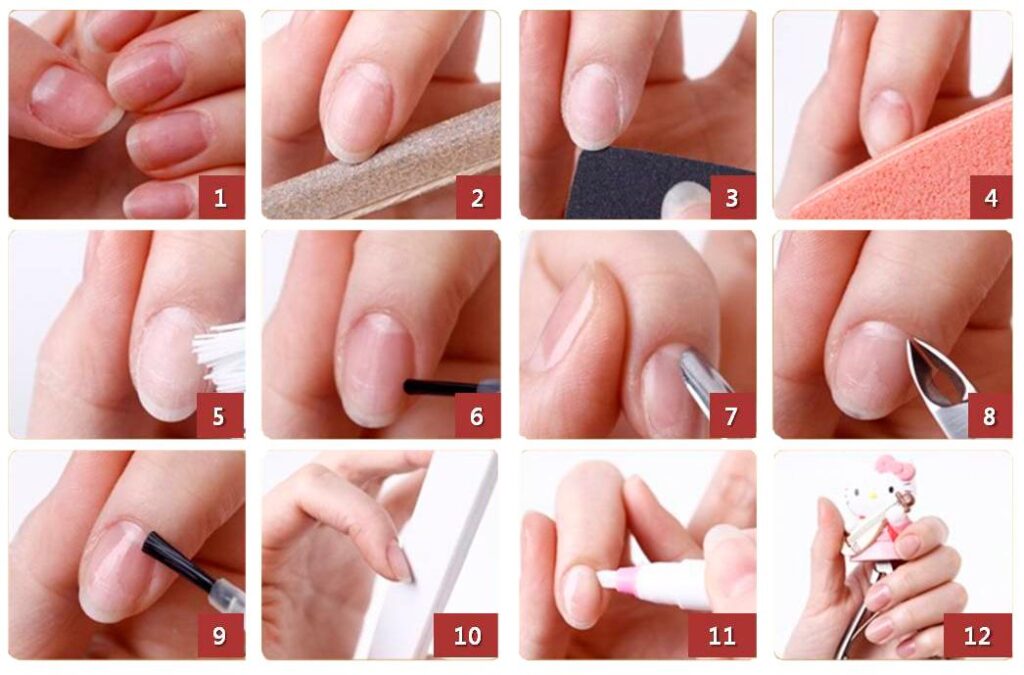
Preparation Process:
- Remove any old polish.
- Wash and dry your hands thoroughly.
- Shape your nails using a nail file.
- Gently push back your cuticles.
- Buff the nail surface lightly for a smooth finish.
- Apply a small amount of hand cream, avoiding the nail plate.
Proper preparation helps polish adhere better and creates a more professional result.
Step 2: Apply a Base Coat
Never skip the base coat. This important step protects natural nails from staining and creates a smooth foundation for your manicure.
Apply a thin, even layer and allow it to dry completely before moving on to color.
Step 3: Add Your Color
Choose your favorite nail polish shade and apply it in thin layers.
Pro Tip:
Two thin coats always look better than one thick coat. Thin layers dry faster and reduce the risk of smudging.
Allow each coat to dry before applying the next one.
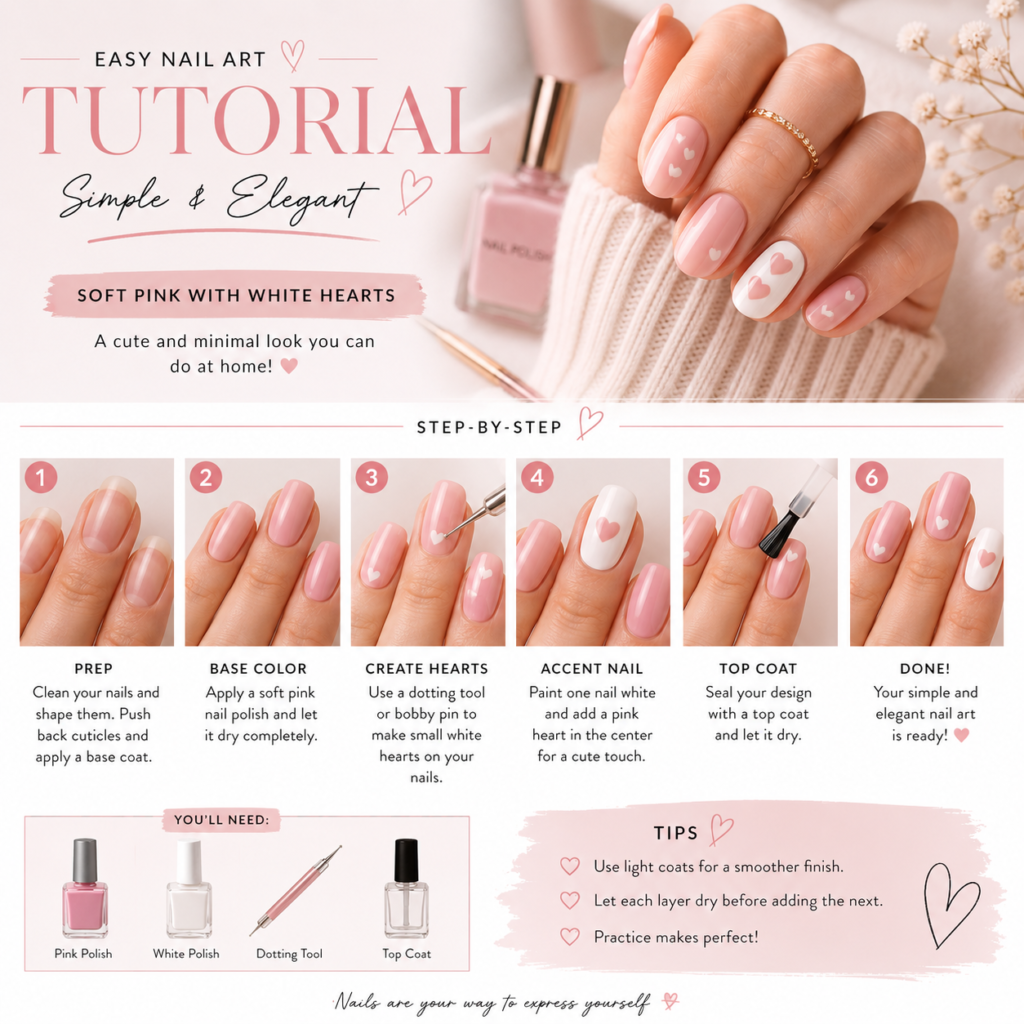
Step 4: Create Simple Nail Art
Beginners can start with easy designs that still look elegant and trendy.
Minimalist Dots
Use a dotting tool or the tip of a bobby pin to create tiny dots on accent nails.
French Tips
Paint the nail tips in white or colorful shades for a modern twist on the classic French manicure.
Heart Design
Draw a small heart on one nail using a thin brush or nail art pen.
Swirl Patterns
Create soft curved lines with contrasting colors for a trendy and artistic appearance.
Step 5: Seal with a Top Coat
A top coat adds shine, protects your design, and helps your manicure last longer.
Apply a thin layer over the entire nail and seal the free edge to prevent chipping.
Common Beginner Mistakes
Avoid these mistakes for better results:
- Applying polish too thickly
- Skipping the base coat
- Not allowing enough drying time
- Over-buffing natural nails
- Using old or dried-out polish
Patience is one of the most important skills in nail art.
Nail Care After Your Manicure
Healthy nails are the foundation of every beautiful design.
Daily Nail Care Tips:
- Moisturize cuticles regularly
- Wear gloves when cleaning
- Avoid using nails as tools
- Apply cuticle oil daily
- Take breaks from enhancements when needed
Strong, healthy nails help every manicure look its best.
Final Thoughts
Nail art is a creative journey that improves with practice. Don’t worry about perfection during your first attempts. Every design teaches new techniques and builds confidence. Start with simple styles, experiment with colors, and enjoy the process of creating beautiful nails that reflect your personal style.
With consistency and creativity, you’ll soon be designing salon-worthy manicures right at home.